
3D Microscopy and High-Magnification Macro-PhotographyDigital Reconstruction and Depth-of-Field Expansionby Prof. J. E. Hart NOTE: This article was written in 2002. Since then several other reasonably priced software packages have become available such as Helicon Focus and Zerene Stacker. The principles of DOF expansion do, however, remain the same, though the algorithm details and performance vary. This page describes various digital reconstruction techniques for photo-microscopy and extremely close macro-photography. Both of these areas of scientific photography are made difficult because of the small depth of field (DOF) usually encountered. In microscopy, for example, the DOF can be extremely shallow (see the table below). High magnification macro-photography with a standard camera and extension tubes or close-up lenses suffers a similar, though slightly less extreme, fate. It is often impossible to obtain sharp focus over the full depth of an object. This makes it difficult to construct good stereoscopic twin-picture 3D images of small subjects, because good focus over the complete extent of the object is required for successful stereoscopic rendering. The Depth of Field Problem. The table below lists typical DOFs in microscopy (from the Microscopy Lab, Florida State Univ.).
For the 80X and 100X microscopy objective lenses the depth of focus is less than a wavelength of light. In normal microscopy this dealt with by using thin sections. But clearly, for 3D, you want depth in the subject. For such cases the DOF will usually be just a small fraction of the total height of the object being photographed. Digital Enhancement of Depth of Field.This lack of DOF actually can be used to one's advantage. Suppose you move the microscope's stage up in tiny steps, so that the plane of focus passes across the subject. Using a digital camera to take a picture at each step, you get a vertical stack (or sequence) of images, each with very shallow DOF. Only a small part of each image will be in focus. However, it is then (in principle) possible to use digital image processing methods to combine the in-focus parts of each of the planes in the stack into a single completely in-focus image.
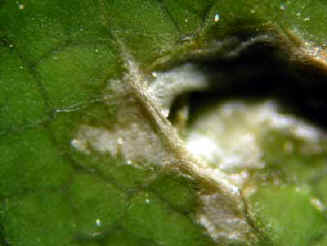
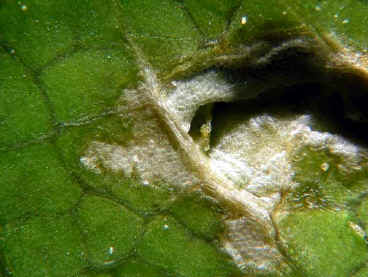
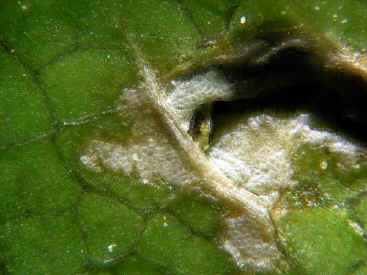
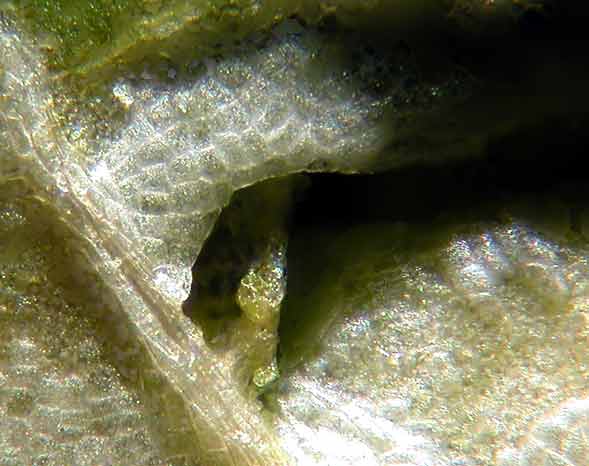
Above is a pair of images in a 40 layer stack of a hole in a leaf, taken with a 5X objective on a reflected light microscope. In the left panel the veins just to the left of the hole are in focus, in the right panel the material deep down in the hole is sharp.
Here is the composite image from 40 layers of the leaf hole (produced by Automontage, Blend-10, discussed below). The improvement over the individual images is dramatic. Software and Methods for Enhancing Depth of Field.There are many different approaches to this. One can try and work backwards using a knowledge of the system's optics to unravel or "deconvolve" fuzzy images into sharp ones. This "deconvolution" method requires a knowledge of the microscope or camera's "point spread function". Although effective, to use deconvolution software you need to know this. If you are trying to apply these methods using a number of different lenses or macro cameras, it becomes impractical. Deconvolution software packages are also expensive. Other approaches are more device independent and can do equally well (as illustrated above). These use various contrast or edge detection algorithms to find the sharpest elements in each layer, along with various combination and de-speckling (hole filling) algorithms to render the composite. In 2002 we experimented with 4 ways of doing DOF enhancement. In 2010 more options than these are available (such as Helicon Focus, for example).
In Photoshop one can manually select in-focus areas using the feathered selection tool. Then copy these selections into new layers, and merge the final composite. Alternatively one can build up a composite by using the clone tool to write the in-focus parts of each layer (identified by hand) into the composite. This is pretty tedious, but can be used to clean up an image generated by one of the automated tools (an example is shown below). For more than a two or three layers this manual method became unbearably slow (for me). Astrostack was developed for combining small CCD frames in astrophotography, primarily as a noise reduction tool rather than a compositing tool (astrophysical objects don't have a DOF problem, the ratio of the radial size of the object to the distance to it is usually infinitesimal). The current version (as of 11/02) only works with individual color planes (R, G, B). Perhaps worth a try, or keep visiting the site as a color version is apparently in the works. On the B&W tests I did, this program did not seem as effective as the next two, but it might work OK with other images than the ones I tried. CombineZ is a small (100Kb) executable file that works nearly as well as the major commercial package AutoMontage for generating enhanced DOF composites. It's really a quite remarkable program. It doesn't have all the features (especially depth map and stereo image construction), but is pretty good for macro-photography where these tools are not terribly useful. AutoMontage is a complete package for image analysis. Designed for microscopy, it also seems to work pretty well for certain types of macro-photography (as discussed below). It does feature depth map generation and internal stereo rendering. CombineZ and AutoMontage in a Macro Photography Example.When creating a stack of images with a microscope, you move the stage up (or down) in tiny steps. Because of the shallow depth of field and typically small vertical extent of the subject you don't move it very far compared with the working distance of the objective lens. Thus, changes in the image magnification are very small. If you try the same thing for macro-photography, by moving the subject closer to the camera, or by moving the camera closer to the subject, in most cases the magnification (or the image size on the CCD plate) will change substantially. In such cases it is very difficult to use the above programs. You either have to carefully resize all the images in the stack, or perhaps change the focal length of the lens slightly as you move the subject (say), to retain the same image width. This is difficult to orchestrate because small focal length changes are required, and my tests were not too great. The same general problem exists with a bellows or macro lens that focuses by moving the lens a long distance out from the camera. The situation gets worse as the average magnification goes down and the subject size goes up. However, fortunately, I have found that certain macro lenses that have internal focusing do not suffer this problem as severely (a major discovery for me!). In these lenses the distance of the front element to the film plane (and to the fixed subject) doesn't change as you move the focal point across the subject. This is how macro-focus is implemented on many digital cameras such as the Nikon CP995, CP5000, Minolta Dimage 7, etc. The performance of Digital SLR's (DSLR's) in this respect will depend on what sort of lens is used. Internal focus macro lenses may work well (hopeful speculation - not yet tested). Anyway, let us now look at an example of the interior of a flower shot with a digital camera at its closest focus setting. In this camera focus may be set manually, not by an analog ring, but by specifying one of a set of values (in feet) using the camera's selector buttons. The closest steps are .06, .10, .13, .16, .20, .23, etc.,.feet. Unfortunately the percentage change for the first couple of steps is pretty big. It would be nicer to have finer increments, in order to make more layers, but let us proceed anyway. It is well known that a smaller sensor or film with a fixed pixel or grain size will have more DOF. For example, a full frame (35mm wide) CCD with 10 micron pixels will have a shallower depth of field (for fixed subject and image sizes) than a 10mm wide CCD with 10 micron pixels (holding exactly the same image, now spanning the 10mm). You can think of it as trading off of resolution for DOF. It is sometimes said that digital cameras (with small sensors) have more DOF than film cameras. This is true, but it is related to the fact that the small sensor has much less resolution than a full frame sensor (or 35mm film). The point is that with a digital camera you sometimes can indeed get more DOF. But it isn't enough. This is because unfortunately you can't increase the f-stop of the lens on the digital camera (to get even more DOF) to the same degree that you can with the film camera. Because the digital camera's imaging sensor is small, the lens is small, and so the aperture hole is small. This leads to diffraction aberrations. Most consumer digital cameras don't stop down more than f8 or so. At f8, and at the closest focus of the camera, the DOF is still too shallow for many, if not most, extreme macro subjects.
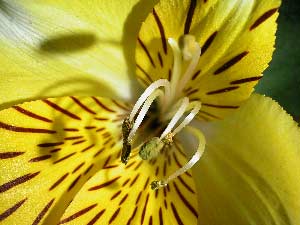
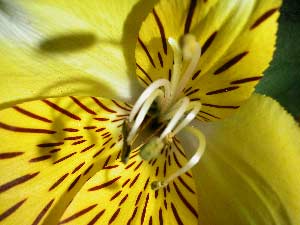
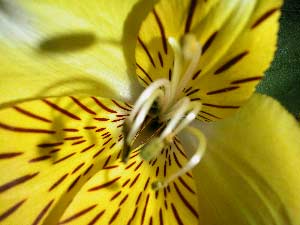
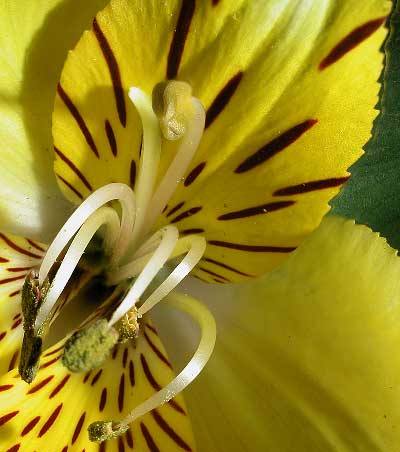
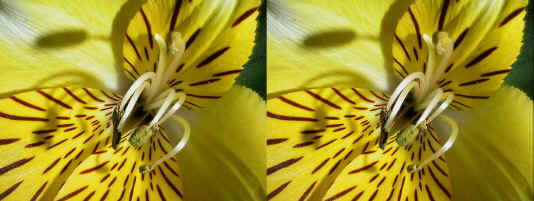
Here is a stack of just 4 images at f8 spanning a flower. These go from in-focus at the very top of the stamen (upper left photo, d = .10 feet), to in-focus at the very bottom of the background (lower right photo, the green in its upper right, d = .20 feet). It would have been better to have more layers in the middle since the big green seed head is never really sharp, but we are stuck with the predetermined steps on this particular camera. Let's see how the various programs do with this.
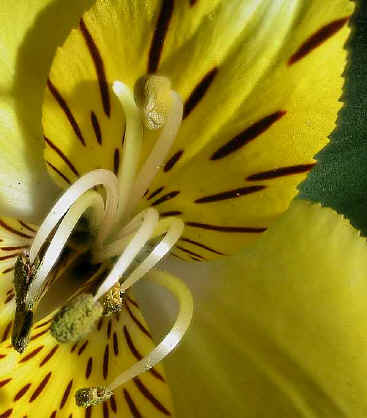
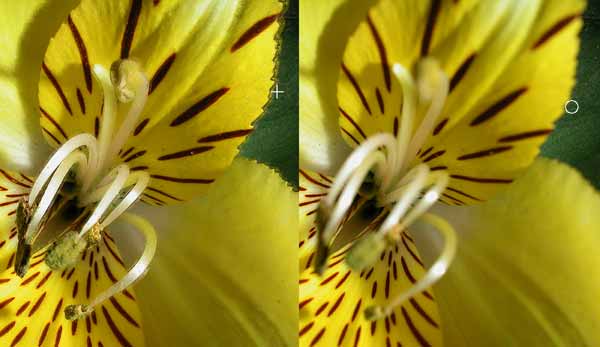
AutoMontage CombineZ On the left is AutoMontage (CW-20) and on the right is CombineZ (20-2). The parameters in the parentheses are enhancement type (centerweighted), the patch-size used in contrast evaluation and detection (for AutoMontage), an edge detection parameter, and despeckle parameter (both for CombineZ), respectively. These setting gave me the best results.
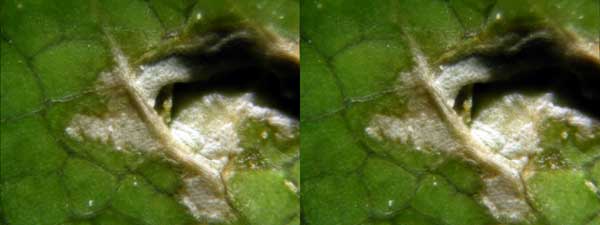
Here is the leaf hole again. Left: Automontage (Blend-10), CombineZ (20-2). The compound weighting of AutoMontage does a little better job with the flower edges on the right of the image. Compound weighting uses more than just the adjacent layers in determining the height of the in-focus elements. This seems important when the subject width changes slightly between the layers (as in macro vs. micro photography). CombineZ has more problems with the edges (notice the ghosts). For the leaf-hole, the comparison between the two programs is more favorable. If you look very closely, the only area where AutoMontage wins out is deep down in the dark hole itself. For Automontage, because this leaf is shallow and there are not a lot of areas where out of focus parts block the view of deeper parts (as happens with the flower under the stamen and under the yellow leaf edges), a scheme called Blend, which uses only adjacent layers in determining planes of focus, is most effective. Blend does not work as well for the flower, as illustrated below.
Automontage Blend -10. Note error in upper right. So, given the infinite price ratio of these two products (one being free, the other being about $3K), can we fix up the CombineZ images? Such techniques might also be useful for AutoMontage. The CombineZ program has some tools to help, but so far I haven't figured them all out (there is not much documentation). But we can use Photoshop to fix most simple problems. In order to remedy the CombineZ flower petal edge problem, we notice that it's the deepest layer (with the sharp green background - shown in the quad panel above) that should "shine" through. Paste this layer onto a canvas along side the original composite. The panel below shows the original (left) and the deepest layer (right).
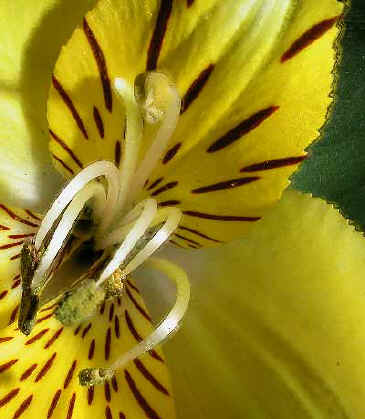
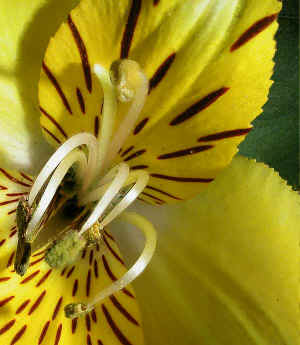
Using the Clone Tool with the source (circle) being set in the deepest layer, and the destination (cross) being at the same spot on the composite, move along the edge and replace the yellow double-vision error with the correct deep data. Do similar things around the stamen. After all clones are done, crop and save the left panel. In a few minutes you have:
This now looks just as good as the AutoMontage CW-10 result. The CombineZ leaf hole is also easily fixed up:
Comparison of original (left) and manually cloned-up CombineZ leaf hole core (right). Twin Shot Stereo Macro-photography.In order to get stereo images from macro photographs you just take two separate pictures, shifting the camera to the left slightly for the second shot sequence. This gives you two vertical stacks. Enhance them (using one of the above programs), fix them up manually if need be, then use a registration program to generate the pair. The separation, or stereo base, is typically 1/30 the distance to the subject, or whatever is needed to cause a horizontal shift of the subject in the image plane amounting to about 3%. What you end up with is a stereo parallel-view pair like
A number of other stereo formats (anaglyphs, shutter glasses, mirror view, etc.) can be generated from this. Stereo Photo-microscopyUnfortunately, for many microscopy applications the twin shot method is not very effective. This is especially true as the subjects get smaller and shallower, as is typical with higher magnification. In such situations, when the microscope stage is moved sideways to get the second shot, you don't see "into" the subject at much of a different angle. Imagine the subject to be skyscrapers. These are tall and photograph them looking down from a hot air balloon. As you shift your camera horizontally (as the balloon drifts), you see the sides with much different perspective. If the scrapers are short and stubby the differences in deviation between the top (near) and bottom (far) parts is small, when you slide your point of view sideways. This is where AutoMontage's extra features are most useful. When many layers are used to make a composite, AutoMontage interpolates to find the vertical locations of the in-focus bits of the subject. This generates a "depth-map", like a topographic map, of the subject that then can be used to digitally generate a 3D rendering or stereo view.
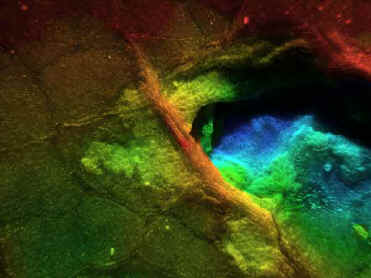
Here is the depth-map for the leaf hole. The veins are closest (red) and hole is farthest down (blue), as the individual pairs at the top of the article confirm. With this a stereo parallel pair is generated:
Conclusions.Digital techniques of image processing can be applied to vertical stacks of images to effectively enhance the depth of field (sharpness) of macroscopic and microscopic subjects where depth of field is often limited. This permits us to generate good stereo views of such objects.
|


© Hart3D - All Gallery images and videos are copyrighted John Hart. All rights reserved. No part of these pages, either text, videos, or images, may be used for any purpose other than for personal viewing. Reproduction, modification, storage in a retrieval system or retransmission, in any form or by any means, electronic, mechanical, or otherwise, is strictly prohibited without prior written permission.
|